-
Step 1: Measure the actual ceiling cut-out, not the spec sheet
-
Step 2: Check the emergency light battery chemistry and date code
-
Step 3: Verify Zigbee spots against the actual hub
-
Step 4: Compare Samsung LED displays on total cost, not sticker price
-
Step 5: Read the warranty terms before signing
-
Step 6: Build a 48-hour buffer into the plan
-
Step 7: Test one unit before installing the rest
-
Step 8: Document everything for the client
-
Common Mistakes to Avoid
Six days before a client's store opening, I got the call. The downlight sizes on the order sheet didn't match the ceiling cut-outs, the emergency light shipment had stalled at a regional hub, and the Samsung display they'd already paid a deposit on was sitting in a warehouse 400 miles away. Normal turnaround on those pieces? Three weeks.
We made it work. Barely.
That was the last time I improvised a project from memory.
In my role coordinating lighting and display orders for commercial fit-outs, I've handled 200+ rush jobs in five years—including same-day turnarounds for restaurant groups and retail chains. This is the checklist I use when the deadline stops being comfortable. Eight steps, in the order that has saved me the most trouble. Skip one if you want. My advice: don't.
Step 1: Measure the actual ceiling cut-out, not the spec sheet
Before you order a single downlight, measure the cut-out yourself. Not the architectural drawing, not the fixture schedule—the actual hole in the ceiling.
In March 2024, a spec sheet called for six-inch downlights. The cut-outs on site were five and a half. We caught it 36 hours before the client's inspection and paid $200 in overnight shipping to replace one fixture. The rest needed adapter rings. Not ideal, but workable.
Standard downlight sizes don't help if you rely on them blindly. A "4-inch downlight" from one manufacturer fits a 3.75-inch cut-out; from another, it needs 4.25 inches. Nominal size is a category, not a measurement. Record three numbers for every opening:
- Cut-out diameter — the actual hole in the ceiling
- Housing clearance — what fits above the ceiling (and whether there is insulation or a joist in the way)
- Trim size — the visible ring, which may be larger than the cut-out
For a standard drywall ceiling, this is fairly straightforward. For a coffered or tray ceiling, it gets complicated quickly. Retrofitting into an existing ceiling makes it even more important. Plaster, tile, and drywall all behave differently. And check the driver location—some downlight housings have it integrated, some have it remote. That changes what gets installed in the ceiling and what doesn't.
Step 2: Check the emergency light battery chemistry and date code
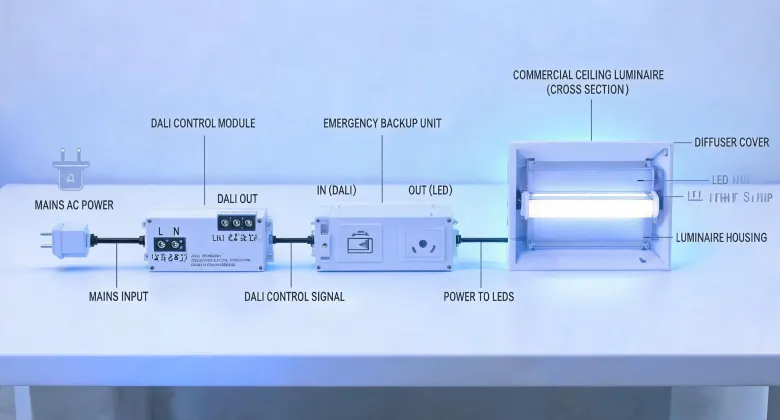
The question I get most often from clients is: how long do emergency light batteries last? Honestly, it depends. What I mean is, there's no single lifespan number that applies across all chemistries and usage patterns. But here's what I've seen:
- Nickel-cadmium (NiCd): usually 3–4 years of dependable service
- Nickel-metal hydride (NiMH): closer to 4–5 years
- Lithium-based batteries: the claims vary widely, from 5 to 8 years. Some are probably accurate. I'd want test data before relying on it.
I don't have hard data on industry-wide failure rates. What I can tell you anecdotally: fixtures we've tracked show most batteries are fine at year three, get inconsistent around year four, and fail noticeably by year five. Corridors with frequent discharge cycles see shorter life. Lobby units on maintained mode tend to do better.
Two practical moves:
- Ask for the battery date code before you install. Write it on the fixture with a marker.
- Schedule a discharge test after installation. If a battery can't hold its rated duration, you'd rather find out before the inspector does.
Per FTC advertising guidelines (ftc.gov), any battery life claim from a vendor should be substantiated. If a supplier quotes "five years" verbally, ask for the test report in writing. If they can't produce one, assume the claim is marketing.
Step 3: Verify Zigbee spots against the actual hub
Zigbee spots are popular because they're flexible. That flexibility has a cost: compatibility is never guaranteed until you test it.
I assumed a batch of Zigbee spots would pair with a client's existing smart system. Didn't verify. Turned out the spots used a Zigbee profile the hub didn't support. Eleven fixtures installed, every one of them non-responsive. We pulled down, replaced, and ate the labor. A lesson learned the hard way.
Before ordering any Zigbee lighting:
- Ask which Zigbee version the spot uses. Look for Zigbee 3.0.
- Check the hub's compatibility list for the exact model number.
- Order one sample. Test it with the client's hub before placing the bulk order.
- Ask about firmware. Can the fixture be updated, and does that void the warranty?
That last one is the step that gets ignored most often. Smart lighting that can't take firmware updates becomes a support problem. For a single room, maybe not a big deal. For a commercial installation with dozens of spots, it's a liability.
Step 4: Compare Samsung LED displays on total cost, not sticker price
Samsung-LED is a name our clients ask for constantly. The brand spans everything from cinema-scale display walls to compact commercial TVs. The challenge is pricing.
Take the Samsung Onyx LED cinema screen. It's a direct-view cinema display with modular panels, integrated processing, and specific acoustic requirements. Clients often search for "samsung onyx led cinema screen price" and get confused by the range of estimates. That's because it's a project-quoted product—installation, calibration, and supporting hardware each add to the base cost. The price talk you see online is misleading without context.
On the smaller end, a Samsung 28 inch LED TV seems more straightforward. You look up the price on a retail site, compare with another brand, done. But the sticker price is just the conversation starter. A commercial installation needs mounting hardware, a content device, often a network drop, and sometimes a commercial warranty—consumer TV warranties don't cover business use in many cases.
Why does this matter? Because a $450 quote can turn into $750 once you add labor and accessories. A $610 all-inclusive offer from someone else can actually cost less at the end of the job.
For every display we evaluate, I calculate total cost across these line items:
- Base unit price
- Shipping and delivery booking
- Mounting hardware and installation
- Content player or processing device
- Network/infrastructure changes
- Commercial warranty coverage
- Lifespan and replacement cycle
The lowest unit price rarely wins. The vendor who itemizes everything upfront is a better partner than the one who goes vague on details.
Step 5: Read the warranty terms before signing
The most expensive page to skip is the warranty. On a rush project, everyone assumes coverage is simple. It rarely is.
Check three points in particular:
- Is labor included? Parts-only warranties leave you paying an electrician to pull a ceiling fixture that failed.
- Is the service on-site or return to depot? Depot returns mean downtime, which a commercial client won't accept.
- What voids the warranty? Some manufacturers void coverage for non-approved mounts or freestyle installs.
I learned never to assume "we'll take care of you" from a sales rep. If it's not written in the quotation or the warranty document, it's a nice story, not a term. Get everything in writing before the PO goes out.
Step 6: Build a 48-hour buffer into the plan
This is the step everyone agrees with and almost no one schedules. The vendor says "delivery in three working days," the calendar says that fits, and everyone moves on.
I knew I should build in extra time on a $12,000 project last year, but I thought, "they've delivered on time before. What are the odds?" Well, the odds caught up with me. The shipment sat at a transfer hub for three extra days with no explanation. We managed to get a local installer to work a night shift and saved the deadline. It cost extra, but we saved the project.
Since then, our company policy is a 48-hour buffer on every rush order. If the client needs fixtures on site by the 25th, we order for the 23rd. If the quoted delivery lands exactly on the deadline, we look for a faster option or a backup plan. That policy started because of a mistake I don't want to repeat.
Step 7: Test one unit before installing the rest
Proof images look great. Spec sheets look correct. The first item from the production batch is the only evidence that matters.
I skipped the sample test on a 30-unit downlight order in 2023. The units had a low-brightness flicker that only showed up after a few minutes of operation. We didn't notice until nine fixtures were installed. Four hours of labor pulling them down, another two hours diagnosing the driver, and a late-night reshipment to fix it. If I'd spent 10 minutes checking one unit, that whole cost disappears.
Now the rule is simple: no full installation until one unit has passed a 15-minute functional test.
For Zigbee spots, test one with the actual hub. For displays, run the content management system on one unit. For emergency lights, test the battery discharge once. This step is non-negotiable on rush jobs—that's exactly when you can't afford a systematic failure.
Step 8: Document everything for the client
Photograph the measurements, the battery date codes, the serial numbers, the installed surfaces. It sounds administrative, but it's the difference between a smooth closeout and a he-said-she-said six months later.
I wish I had tracked site documentation more carefully from the start of my career. What I can say anecdotally: every project with a proper photo log closed out cleaner than the ones without.
Common Mistakes to Avoid
A few final notes from the jobs that went sideways:
Treating "same specs" as identical across vendors. Each manufacturer interprets a spec in its own way. One vendor's version of "same specifications" turned out noticeably different from another's—get every commitment written into the quotation.
Assuming the cheapest quote is the best deal. The lowest unit price frequently loses on shipping, installation, and warranty gaps. Use the TCO framework from Step 4 for lamps and displays alike.
Installing before testing. Yes, I said it already. It's repeated here on purpose.
Ignoring the local supply chain. Honestly, I've never fully understood why contractors avoid building a relationship with a local electrical distributor. They're not a replacement for the manufacturer order—they're the safety net. When a shipment fails and the opening is in 48 hours, a local source can save the project.
Not knowing what the FTC requires in product claims. A vendor's verbal promise about brightness, battery life, or energy savings shouldn't count anyway—but the FTC guidelines (ftc.gov) are worth knowing because they give you a basis to ask for substantiation. When a claim matters, ask for the evidence. If they produce it, great. If not, adjust your expectations accordingly.
Measure before you order. Test before you install. Buffer before you commit.
Look, I'm not saying this checklist turns a three-week job into a two-day one. But when time is short, the wins are in the details. The projects that closed on time weren't the ones with the best luck—or rather, they were the ones that didn't need luck, because they had already checked the variables. That's been my experience across 200+ rush jobs, and the ones that went wrong were, almost without exception, the ones where a step got skipped.